Mama Miller Parenting

Passionate parenting and homemaking.

Juice Box Robots- A Guest Blog

I am super excited to be hosting my first guest blog! Ciara is a dear friend from college and couponing guru. I hope you enjoy her adorable Valentine creation!

*Juice Box Robots*

As the mom of a 5 year old boy, I am constantly looking for creative ways to show him that I care. Since his first Christmas at daycare, I have been making special gifts and goody bags for his classmates. I work full time and I go to college full time, so finding time to craft is a challenge. Many moms ask me why I put myself through the added work of making these things for his friends at school and my answer has always been “it’s worth it”.

This was solidified this past Christmas when I walked into the class with my normal box of party bags and a little girl in his class ran up to me and said “Miss Ciara, are those the bags like what you made us last year?” and when I said yes she began jumping up and down and squealing with delight. He starts school in the fall and everyone in his class will be at a different school, so I decided to make this Valentine’s Day special for them. Hence, Juice Box Robots. Below are the directions and a photo of the steps! I found this originally on Pinterest but without the foil. I decided the foil would make them look more like robots J.

What you will need for this project to make 20 robots (I list the brands because of the quantity they are sold in):

2 Minute Maid 10 packs of juice boxes

20 Musselman’s organic applesauce cups

3 bags of Sunmaid mini raisin boxes

1lb bag of smarties

Foil (I don’t know the exact amount, I have a giant roll of it, but I used a lot)

White paper

Red construction paper

Black marker

Scissors

Transparent tape

Kraft Permanent glue spots (or hot glue if you would prefer). I used the Kraft spots because although they are “permanent” they can easily be pulled apart. Doing so will rip the foil, but this way the food and drink are protected from damage. When they are pulled apart the packaging of the products will not be affected.

Step 1. Gather all of your products, and prepare your foil. I had to eyeball how much foil to use, I used about 10”-12” of foil to wrap each set of items.

Step 2. Wrap each item (I wrapped them in the foil like I do a present, with the seam on the back).

Step 3. Place the kraft spots (or hot glue) on the inside edge of the top of the raisin box, and put the juice box on. Next, put more kraft spots/glue on the top of the juice box and attach the applesauce cup. Press firmly (but not too hard) to secure the pieces. Tape the exposed end of the smarties to the sides of the juice box for the arms. Attach the heart with clever saying on the front using kraft spots/glue. Draw eyes on white paper with the black marker, draw a mouth, and tape them on. If you use the invisible tape you can just put it over the eyes and mouth and it won’t show.

Step 4. Enjoy your majestic creation! Also, take a nap, it’s exhausting 😉

So very cute!

So very cute!

1 Comment »

Our DIY Christmas

Now that the Christmas tree is packed away and Valentine’s Day is almost upon us, I guess it is safe to share some of our crafty Christmas projects.

This year I made bows for all my nieces and my cousins’ and friends’ girls… So many bows.

20130203-195855.jpg
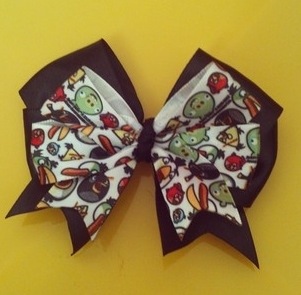
This is probably only about half the bows we made this year. My nieces requested Angry Bird bows but I could not find the ribbon for it anywhere. Of course I found a whole stinking display of it at Jo-Ann’s the week after Christmas!

20130203-200254.jpg

I only had a few little boys to make presents for and decided to go with t-shirt capes and masks. You just cut an old t-shirt into a cape shape, leaving the neckline. Then you can embellish with felt or material or t-shirt paint. You can use some of the leftover fabric to make a mask. They were easy, no-sew, and a big hit.

20130203-200557.jpg

20130203-200612.jpg

20130203-200626.jpg
I made some original art for my parents and in-laws…

20130203-200841.jpg

20130203-200857.jpg
I painted my base color on the canvas with acrylic paint. The petals are done with craft paper. I arranged them before using mod podge glue to attach them. After adding a top coat over the entire thing, I added the little gemstones in the middle.

I also did a picture for my little sister.

20130203-201137.jpg
For hers I spray painted a base coat of silver paint on my canvas. When it was dry I used crisscrossing rubber bands to create my power lines. I spray painted blue over the rubber bands and cut them off when it was dry. I attached my craft paper bird silhouettes with mod podge.

We have one side of the family that does a white elephant gift exchange with homemade gifts instead of store bought presents. It has become an incredibly fun tradition. We have some awesomely talented people in our family!

My grandma always paints a picture. My mom usually crochets something. We have seen hand-carved items, cookies, sewn items, lawn decorations, and everything in between. This year my hubby made Oreo truffles. So good! I made a tin of letter magnets.

20130203-201800.jpg
These are simple. You just need clear stones (the little round ones that are flat on the bottom), tacky glue, paint brushes, scissors, small round magnets, and a stack of old magazines.

You cut letters or small pictures out in circles to fit your stones. Glue the picture on the flat side of the stone so that the picture shows through the raised side. Then glue the magnet on the back of the picture. Keep them flat and give them a day to dry fully. I made 48 magnets with letters and few pictures and put them in a Christmas tin.

As a bonus:
Oreo Truffles

1 package Oreos
1 package cream cheese (softened)
Chocolate or Almond Bark
A glass bowl
Spoons
Cookie scoops
Cookie sheets
Parchment paper or nonstick foil
Food processor or good blender
Sprinkles (optional)

1. Crush entire package of Oreos in food processor and add the block of cream cheese. Blend until it forms a thick chocolate paste.

2. Use a cookie scoop to scoop balls of Oreo paste and place on parchment paper or foil on a pan. Place pan of balls in the fridge or freezer for 30 minutes- 1 hour to firm up.

3. Melt chocolate or almond bark in your glass bowl according to the package directions. (Make sure the bowl is super dry to prevent the chocolate/bark from seizing!)

4. Take the balls out of the freezer and drop one into the chocolate/bark to coat. I usually use two spoons to pass the truffles back and forth to get off excess chocolate. Set the truffle on the parchment paper to harden. If sprinkles are desired, sprinkle them on immediately after dipping in chocolate. Dip and sprinkle all your truffles, let them harden, and cut off any excess chocolate with a sharp knife. Keep refrigerated.

These are so stinking good! They put cake balls to shame and you don’t have to bake anything!

Happy crafting/truffle making!

Leave a comment »

Soap Snow and New Friends

Yesterday afternoon was gorgeous! We had to play outside. Texas is rarely in the 50s or 60s in the middle of the afternoon.

The kids ran and kicked a ball around in the field by our apartment. I went in and filled our red tub with toys, scoops, old jars, and two big soap clouds.

20121128-133601.jpg

Pretty soon our soap clouds had been pulverized to snow.

20121128-134012.jpg

E lost interest after a bit and went back to chasing her ball and rolling in the grass. K asked if we could invite the little boy from a couple houses down to play.

He always says hi to everyone, but this was the first time he has gotten to play with neighbor kids. I was excited for him to make a new friend. Pretty soon we had two new friends (both 5) playing with us. I had to make two more soap clouds and get more scoops.

20121128-134517.jpg

I promise I’m not a crazy hoarder, but I do tend to hang on to glass jars. K loves playing with them and filling them with things. The kids had the most fun scooping “snow” into jars.

I let each of our new friends take home a jar of snow. I wrote their mom’s a note explaining that it was Ivory soap and how to make it. I figured I would probably want an explanation if my kid went to play and came back with a jar of white powdery stuff!

Eventually the kids ran home. K, E, and all the tools/toys went into the bath. We sprinkled “snow” over them. They were extra clean. Their clothes and blanket washed fine, but I did set an extra rinse cycle.

It can easily be an inside play activity if you vacuum afterwards. It makes the house smell great!

Leave a comment »

Thankful Little Turkeys

I am so excited about Thanksgiving!

I made E’s mini turkey bow:

20121111-202018.jpg

After church this morning I got asked to come up with a craft for our AWANA Cubbies tonight. We decided to make Thankful Handprint Turkeys.

You need:
Paper plates
Red, orange, and yellow paint
Brown paper or white paper colored brown
Markers (red, orange, and black)
Sharpie (I used silver.)
Card stock or paper for the back ground
Scissors
A sink or wipes to wash hands

For older kids you could let them make their own body/head and color it. Our Cubby class is mostly 3-4 year olds, so I did them ahead of time.

For the head and body cut out a bowling pin shape from the brown paper and use your markers to make a face. I didn’t have brown paper, so I colored textured white card stock and cut out 12 little bowling pin bodies. I drew on the beak, wattle, and eyes.

For the feathers we put a glob of red, orange, and yellow paint on a paper plate. We went to each kid and put their hands in the paint and had them do overlapping fanned fingers handprints. The three colors together had a neat effect. If you stick the body on right away it won’t need glue.

We wrote “I’m so thankful for…” at the top and asked each child what they were thankful for. The parents loved them and the answers were sometimes funny. The green one says he is thankful for the “TCU Bullet Train”.

20121111-204357.jpg

This concept would make a cute shirt or onesie. You could let the handprint feathers dry and paint on the body and face. Sorry I don’t have the step by step pictures. We had our hands full with 12 little Cubbies!

Leave a comment »

Felt Turkey Bow

I decided to use my felt scraps from the aquarium and space scenes to make E and her cousin turkey bows!

I used felt (dark brown, light brown, red, orange, and yellow), rhinestones, needle, thread, hot glue gun, and an alligator clip.

First I cut a circle in the dark brown felt and stitched all around the edge.

20121109-232540.jpg
I pulled it tight and created a little round “pillow”.

20121109-232650.jpg
I made a smaller “pillow” and glued it on top of the bigger one for my turkey’s body and head.

20121109-232800.jpg
I cut out a little red wattle (the red dangly thing on a turkey’s neck) and orange beak. I used rhinestones for eyes. I used tiny dots of hot glue for the face pieces.

20121109-233108.jpg
I cut out strips of my feather colors. (2 red, 2 orange, 2 yellow, 1 light brown.) I folded them like so:

20121109-233233.jpg
I arranged my feathers (red, yellow, orange, brown, orange, yellow, red) and stitched them together at the bottom. I probably didn’t need to stitch them but I was still deciding how to attach them.

20121109-233454.jpg
I hot glued the body onto my feathers and attached my alligator clip to the back.

Back:

20121109-233559.jpg

My finished bow:

20121109-233636.jpg

It turned out pretty cute for winging a craft at 11pm because I was jazzed on coffee and taking phone pictures… Wow, I just realized that I caffeine craft like others would drunk dial. Living dangerously around here folks!

Watch out- I have a glue gun, a high caffeine level, and rhinestones!

It turned out well for a first run but is a tad big for E. I think I will give this one to my niece and make a smaller version for E. I bet it would be cute with little google eyes but I had rhinestones handy. You can check out our other felt bow projects here, here, and here.

7 Comments »

Homemade Face Peel Mask

I recently decided to try a homemade face peel mask. (Similar to Bioré strips.) I posted a Facebook status about the crazy looks my kids gave me that night. E cried at me and K decided I was a bad guy that needed to be defeated. My husband just laughed at me. He has become accustomed to my homemade products and projects. I don’t think it surprised him at all.

I was told I should have taken pictures…

Well, here they are with the recipe/instructions. Enjoy a laugh at my expense and give this great homemade beauty trick a try.

1. Lightly beat an egg white in a bowl.

2. Smear the egg white all over your face. (I used a paper towel for smearin’.)

3. Cover with pieces of facial tissue.

4. Dab/smear egg white on top of the tissue pieces.

5. Let it dry. This can take a while. Freaking out your kids is optional but recommended. (15-30 minutes.)

6. Peel the dried mask off from bottom to top.

7. Examine your gross little forest of pore gunk and blackheads. (An important step.)

8. Rinse your face with warm water and pat dry.

9. Apply a light moisturizer.

10. Post a comment and let me know your kids’ reaction to your franken-face!

K looking at my wet mask:

20121108-204714.jpg
He told me I was Zurg (bad guy from Toy Story 2). Then he decided I was Spiderman. Personally, I got a luchador vibe.

E was very wary of Spiderman/luchador mommy:

20121108-205137.jpg

Dry mask:

20121108-205235.jpg
I’m not frowning by the way. I couldn’t move my face. I imagine it was how people with Botox face feel.

Peeling it off:

20121108-205402.jpg

Enjoy! It really does work well. I’ve read you can mix egg white and lemon juice and use it as a mask without the tissue and peeling part too. Way cheaper than the special strips.

1 Comment »

Felt Scenes

I apologize in advanced for the pictures. The lighting was not my friend today.

I decided it was time for another fun felt craft. I made a felt pumpkin and ghost a few weeks ago. Today we made a felt aquarium scene and a felt space scene to hang on the wall.

We got a ton of felt in various colors and a large rectangle of blue and black at Hobby Lobby. We also found clear buckets at Target in the bargain bin section. In all, less than $10.

We also used scissors, sharpies, and push pins.

20121108-173814.jpg
I let K dictate the colors to me. We cut out two long strips of black for the aquarium rocks and dark brown for land on the space scene. I cut squiggly pieces for sea weed and drew on the felt with a sharpie for other pieces. We made a crab, fish, starfish, a treasure chest, and a turtle for the aquarium. We did stars, Earth, the moon, Mars, a rocket, aliens, and astronauts for the space scene.

I hung the large pieces of felt on the wall with push pins and hung the bucket with all our pieces.

20121108-174450.jpg

Here is our finished aquarium:

20121108-174546.jpg

Our space scene can be space exploration:

20121108-174640.jpg

Or visiting a new world:

20121108-174748.jpg

I free handed everything but you could easily make templates. The kids are having a blast taking the fish and astronauts on an off.

20121108-174917.jpg

7 Comments »

Spooktacular Bows

How about some more fun Halloween craft ideas?

Every loyal reader, friend, and family member knows my love of felt bows and bow ties. I decided to try something new for the season…

Spooktacular Bows

You’ll need:
•Felt (orange, black, white, brown, and green for the ones I made)
•Tulle (purple)
•Thread
•Alligator clips
•Scissors
•Hot Glue
•Laurie Berkner DVD to distract children (optional but reccomended)

Step 1: Cut two strips or felt. About these relative sizes to your clip. (Me measure things? Ha!)

20121024-145659.jpg
Step two: Cut a small triangle out of each end of your bottom layer piece.

20121024-145823.jpg
Step 3: Put a line of hot glue in the middle of the longer piece/top layer and fold the sides to the middle.

20121024-145950.jpg
Step 4: Pinch the middle in and put it on your bottom layer. There should be enough hot glue leaking out of the seam to make it stay.

20121024-150205.jpg
Step 5: cut out a small triangle on the top and bottom of the bottom layer as shown.

20121024-150330.jpg
Step 6: Use a felt strip or ribbon for the middle and glue alligator clip on the back.

20121024-150455.jpg

These are pretty cute as is…

20121024-150544.jpg

For tulle bottom layer: Wrap a few layers of tulle around your fingers, tie it with thread in the middle, and cut through the loops. Do the top layer the same.

20121024-150720.jpg

20121024-150742.jpg

I embellished my finished bows with a felt pumpkin and ghost. I just cut out the shapes- orange pumpkin, brown stem, green leaf, and white ghost. For the ghost face I used a sharpie.

How cute are these?

20121024-151001.jpg

7 Comments »

Ghost Footprint Shirts

My friend at motherhoodisanart reminded me of a Halloween project we did last year with her super cute Ghost Feet Project.

Ghost Footprint Shirt/Onesie

You will need:
•White t-shirt paint
•Black t-shirt paint
•Glitter t-shirt paint
•Black (or dark colored) shirt or material
•Paint brushes
•Paper Plates
•Black cloth, orange thread, and needle/sewing machine (optional)

Baby E was only a month old last Halloween. My friend and I had decided to let the kids paint pumpkins and make shirts. We easily found black toddler t-shirts for our two year olds but I couldn’t find a plain black onesie anywhere!

I ended up using a white onesie for E’s and painting a black heart for my ghost background. For the toddler shirts we used scrap black cloth and sewed our finished ghosts onto the shirts. We didn’t trust ourselves to get squirmy toddler footprints on the shirts the first time.

We dipped each child’s foot in white paint on a paper plate and made our print on the fabric. We immediately set them on the counter and rinsed their foot in the sink. We then gave the little darlings some acrylic paint on a plate, paint brushes, and some little pumpkins. (Ok, E got some mommy nursing time… She was only a month old!)

When their footprints were mostly dry, we used black fabric paint to add the face and the “Boo”. Glitter paint was added to E’s and my niece’s.

K’s fabric was sewn onto a t-shirt by my wonderful mother-in-law. My niece’s was fabric glued onto a little dress. E’s was paired with a crazy awesome homemade Halloween bow.

Our drying ghosts:

20121024-075905.jpg
K in his finished shirt:

20121024-080018.jpg
E was not amused with her giant bow and being cute:

20121024-080124.jpg

K can still fit in his shirt this year. E has grown a little too much to squeeze into her onesie though. It is amazing how much her little foot has grown!!

9 Comments »

Pumpkin Spice Cake Cookies

20121023-194422.jpg

These three ingredient cookies are amazing. They are also super easy and versatile. They are a slightly lighter option because they contain no oil or eggs!

Pumpkin Spice Cake Cookies
1 box of spice cake mix (dry without any of the usual ingredients)
1 standard can of pumpkin (not pumpkin pie filling)
2 tablespoons of applesauce

Optional: cream cheese frosting

Preheat oven to 350•. Mix dry cake mix, pumpkin, and applesauce. Use a cookie scoop or drop rounded tablespoon onto a lightly greased cookie sheet. (The will not spread much at all.) Bake for 8-12 minutes until lightly browned.

They will be moist and slightly doughy. They are amazing plain or frosted. We’ve frosted them with dark chocolate icing, but went with cream cheese frosting today. I used a small cupcake corer to take a bit from the middle of each cookie.

20121023-195502.jpg
I used a freezer bag instead of messing with a piping bag.

20121023-195628.jpg
I saved the cores for toddler snacks! They are the perfect size for little fingers.

20121023-195801.jpg
Here is E chowing down on a couple of her pumpkin treats…

20121023-195907.jpg
The picture shows them plain, cut in half and filled, cored and filled, and just frosted.

20121023-194422.jpg
The batter can be eaten raw because there are no eggs. The batter is great with graham crackers. Can’t you picture a hollowed out pumpkin filled with tasty dip?

I also want to try adding pecans and dipping them in white chocolate make cake balls.

I love pumpkins!

5 Comments »

TheBamBlog

Real. Life. Storytelling.

Nontoxic Megan

Living a healthy life (the best way I can)

scottishmomus

What I See

Stuff Kids Write

Like stuff adults write. But funnier.

Louis and Mel

Let's have some pun.

mummy flying solo

...murmurs from the depths of my world

Baking in a Tornado

Passionate parenting and homemaking.

Dates 2 Diapers

Passionate parenting and homemaking.

The Three Bears

Life as I know it...

Thirty-Four Million Moments

Everything from motherhood to love...and anything else that comes to mind.

Making Memories in The Chaos.

A family and lifestyle blog by a SAHM in Northern Ireland.

Máthair Fiona

Be thankful. Give thanks. Live thankfully.

JDunlap Gaming

A convergence of tabletop gaming, music, and geek culture.

Chronicles of the Deranged

Passionate parenting and homemaking.

What the Mom

Real tips from a mom of 4