Mama Miller Parenting

Passionate parenting and homemaking.

Mama Miller’s Pasta Soup

Be warned, I am not an exact recipe person. I come from a strong southern tradition of throwing whatever you have in a pot and calling it soup or throwing it in the oven for casserole. We tend to view recipes as general guidelines as opposed to precise directions. If you like to know exactly what minuscule fraction of each spice to use, run away now!

Mama Miller’s Pasta Soup

2 32oz cans/boxes of broth (I use fat free chicken)
1-2 package(s) of your favorite pasta (gnocchi, tortellini, or ravioli work best)
1 lb ground turkey or ground beef
1 7.5 oz jar of your favorite spaghetti sauce ( or 2 cups of homemade)
1 6oz can tomato paste
1 tablespoon minced garlic
mushrooms, minced onion, bell peppers, olives, or any other favorite veggies (optional)
Garlic salt, cumin, pepper, parsley, Italian seasoning, or whatever you favorite spices to taste are (this is what I mean by not specific)
olive oil

Bring your broth to a boil in a large pot and add a splash of olive oil, salt, and pasta. (I sometimes add a third can of broth to make it go further.)

While the pasta boils, brown your meat in a skillet. I add a splash of olive oil when using ground turkey. I add my garlic to the meat and the spices I like. Don’t over spice. You can add more later. When the meat is mostly done, I add the veggies and continue to cook until the noodles are done.

When the noodles are al dente, I add the spaghetti sauce, tomato paste, and meat/veggie mix to the pot and let it simmer together for about 30 minutes to an hour (read until we are ready to eat).

The noodles finish cooking through as it simmers. I taste before serving and add any additional spice. We usually serve with bread, salad, and a little Parmesan on top.

Big ol’ pot of soup:

20121017-162842.jpg

Tonight’s soup has three cans of broth, gnocchi, purple bowtie pasta that K dyed earlier in the week, and ground turkey. K is excited about purple pasta and Andy promised to bring his co-worker lunch.

Have a great night!

Bonus: E eating her soup:

20121017-170832.jpg
She is very into feeding herself, so she gets good stuff on a plate without much broth.

Leave a comment »

Pumpkin Activities

It is finally chilly in Texas!

I love Fall. The food (pumpkin, salted caramel, cranberry sauce), the smells, the colors… Love it!

In honor of our cold front today, K and I decided to paint pumpkins while sister was sleeping. We’ll carve one soon, but for now we decided to use a bag of little pumpkins.

Just some acrylic paint and brushes we already had and five little pumpkins.

Here is K painting:

20121006-173748.jpg
Here are our finished pumpkins:

20121006-173925.jpg
Mine is the pink one. At 3 years old, he doesn’t care about pretty. He just wants to paint and that is OK.

Creat a Face Ghost and Pumpkin

I also decided to make him a felt pumpkin and ghost to play with. The felt was 4 for $1 at the craft store. (Loyal readers know I love felt.)

First I drew a pattern on my orange and white felt. I free-handed it. I am not precise on anything, but you could use a template if you are.

20121006-174258.jpg
Next I cut out my pumpkin and ghost and a bunch of different shapes out of black felt. I ever used brown to make 3 different pumpkin stumps and green to make a few leaves.

20121006-174550.jpg
I plan to keep them in a baggie and let him pull them out when he wants to play. If you are working on shapes, you could do only basic shapes. K has shapes down, so I did some wonky patterns too.

Now we are all enjoying some gnocchi and turkey soup. I really love soup weather!

1 Comment »

Neon Noodle Activity

20120923-152453.jpg

Sorry for the lapse for the past few days.

Friday we did E’s 1 year old photos, shopping, E’s 12 month check-up, E’s 12 month blood work, grocery shopping, and Family Game Night at church. Poor baby girl was pretty chipper for a kid without enough naps, 4 shots, and having blood drawn.

Yesterday was my cleaning and my brother’s birthday party.

We’ve had a busy busy weekend.

We started this activity on Saturday morning. K has had a great time with it.

Neon Noodle Activity:

You will need a bag of Italian Trio Pasta, food coloring, and white vinegar. (We try to do natural foods and whole wheat pastas, but we made an exception for this activity.)

First I opened the bag of pasta for K and set up three bowls and a pair of tongs. I had him sort the different types into the bowls. He made up a story about the seashells noodles (shells), wiggly noodles (rigatoni), and stick noodles (penne) going to school together. They went to school but it was time to go home to their families.

20120923-161141.jpg

20120923-161313.jpg

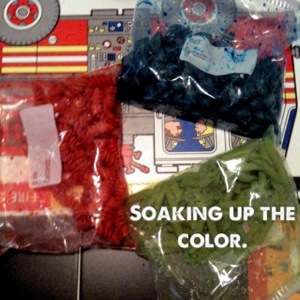
After sorting we put them in separate baggies and K added several drops of neon food coloring and a splash of white vinegar (about 1 tbsp). He shook it up and we let them soak for about an hour.

20120923-162126.jpg

20120923-161923.jpg

20120923-161628.jpg

We spread them out on foil covered in paper towel for a couple hours to dry. At bed time I folded them up in the foil and put them in the fridge until this afternoon.

20120923-162416.jpg

This afternoon I boiled the noodles. I wanted to make sure the colors came out really vibrant, so I did each one separately and added a few drops of color to the water. After draining them, I tossed them together in a bit of olive oil. K was really proud of his noodles.

20120923-162643.jpg

We served our neon noodles with Alfredo sauce, pork roast, and salad. It was a big hit.

20120923-162826.jpg

2 Comments »

Minnie Mouse First Birthday!

We just had E’s first birthday!

(Where did the time go?!)

Here are a few pictures of our Minnie Mouse extravaganza…

Here is our cupcake table!

We’ve got ears, say CHEERS! Craft table for the kids.

E’s Bowtique

Hot Diggity Dog Bar.

K and cousin KT decorating their hats.

K showing me his hat.

Cousin T in her hat.

Nana helped E make a hat.

Mmm. Cake!

We had a great time at her party and a great time planning. Here are a few details for those wanting to know.

Cake Table:
We made 4 dozen cupcakes (vanilla and chocolate), iced in red, and then added oreo ears and a fondant bow. The smash cake was made in a small glass bowl. It has a fondant bow and chocolate dipped oatmeal cookies for ears. We also made a collage of all her monthly pictures.

E’s Bowtique:
I made felt bows and bow ties earlier this week. My mother-in-law used the Cricut cutter at work to make the Mickey shape. We hole punched at the top for bows and at the bottom for bow ties. The sign says, “E’s Bowtique. Please take an E custom creation. Bows for girls and bow ties for boys.”

20120922-144127.jpg

Craft Table:
I used a party hat template to make all the hats. We glued black circles on for ears. We hole punched and tied ribbon in each side. I got various craft supplies at the dollar store for the kids to use on their ears. We also printed out color pages from the Disney Jr. site. The sign says, “We’ve got ears say CHEERS! Please help your little Mouseketeer make a custom set of ears.”

It was so much fun. I can’t believe my baby girl is already a year old!

A few bonus pictures from my phone:

A close-up of the smash cake and one of the cupcakes.

20120915-174624.jpg

20120915-174652.jpg
My sister’s cat with party hat.

20120915-174715.jpg
She was pooped…

20120915-174735.jpg

7 Comments »

Felt Bows and Bow Ties Perfected

So much felt and hot glue today…
20120911-212240.jpg

Guess what?! Baby E’s birthday is this weekend!

I still have a lot to do but I finished a few things today. We are doing a Minnie Mouse theme and decided to make bows and bow ties as favors.

I’ve posted a tutorial in the past on felt bows but I figured out a technique that drastically cut down on glue gun related blisters. I also did a few multicolored bows.

Felt Bows/Bow Ties:

1. Do an accordion fold in the middle of your rectangle. The back will be the side with the edges showing. Put hot glue in the middle of this side.

20120911-210844.jpg

2. Clip your alligator clip to your long skinny strip of felt. Put it (flat side down) onto the glue in the middle back of your bow.

20120911-211104.jpg

3. Wrap the strip around the front and clip into your alligator clip.

20120911-211240.jpg

4. Turn it around (with the back still to you) and fold down the extra felt from the strip. Put a line of hot glue in the crack it creates, cut off the extra, and fold it back down on the hot glue. (This is the step that saved fingers!)

20120911-211548.jpg

20120911-211638.jpg

Done!

Multicolored Felt Bow:

For a multicolored bow cut out the rectangle you want for the top and place it on the other desired color of felt. Cut around it a slightly bigger rectangle of the other color. Follow the regular steps from here.

20120911-211942.jpg

20120911-212038.jpg

How cute is that?!

I added a little felt rosette to this one.

I hope the kiddos like them. We are doing classic red, white, and black Minnie. I’ll definitely post party pics this weekend.

2 Comments »

Felt Bows and Bow Ties

Here’s a shocker… We have a nerdy family.

We love Star Wars, Star Trek, musicals, super heroes, and especially Dr. Who.

Bow ties have become a big thing lately. You know, because bow ties are cool.

For felt bow ties and bows you need:

  • A hot glue gun
  • alligator clips (less than $3 for a big bag at our craft store)
  • sheets of soft felt (4/$1 at our craft store)
  • scissors

Step 1: Cut a rectangle from your felt (this one is about 3′ x 5′) and a smaller rectangle (1′ X 3′). I tend to eye ball my sizes. I’m not good at measuring or follow exact recipes.

Here are my supplies and the cut felt.

Step 2: Pinch the middle of the large rectangle to make your shape and glue it.

This is the back of my bow tie with glue.

Step 3: Clip your alligator clip to the small rectangle and glue it onto the back of your bow tie. Bring it around the front and then tuck it under the open clip. Glue it and cut off any extra felt.

The back of the bow tie with the middle added. Sorry, for the less than great picture. It is hard to hot glue and take pictures at the same time!

Optional (but not recommended) step: Burn the tar out of your finger on hot glue. Dance around the house in pain. Try to run your finger under cold water but realize that you, sadly, live in Texas and it is August- the “cold” water tap only runs warm. Try not to cuss in front of the children… Just keep crafting…

You are done!

They clip really well onto polo style shirts but can also be clipped onto the neck of a t-shirt or used as a hair bow.

Here is K’s bow tie clipped to his t-shirt.

He decided this black bow tie was his “super spy bow tie”. He also has a yellow one that he always wears with his Batman shirt. (Yes, my son is a gloriously nerdy little soul.)

Here is Super Spy K.

Here are few more pictures of finished bows and bow ties from past and present crafting sessions:

Here are a few from today. I love the dinosaur felt I found. The pink one is E’s. I added a little felt flower to it.

Here are a few more bows and bow ties. I love my models. They are super cute.

E’s birthday is coming up and we are planning on doing a Minnie Mouse theme and giving bows and bow ties as favors. I can’t wait! (Although I will probably let the blister on my pinky heal before wielding the glue gun again.)

1 Comment »

Updated: Homemade Baby Wipes

This is my original recipe for homemade baby wipes.

Today I decided to make them in an old baby wipe container. I unrolled the paper towels and layered them back and forth in the container. I mixed the soap, baby oil, and boiled water in a separate bowl. I used a little less water (1 1/4 cups) this time because the noodle of the paper towel roll wouldn’t be there to soak up any extra. I poured the mix over the paper towels, closed it up, and gave it a good shake.

It worked really well and unrolling the paper towels only took a few extra minutes.

20120822-104530.jpg

20120822-104846.jpg

K really likes them. “It is warm!”

Leave a comment »

Easy Homemade Laundry Soap

20120821-174137.jpg

We’ve been really trying to cut back on the use of chemicals in our home. We make our own cleaners, baby food, and baby wipes. It has been so much cheaper and makes me feel good as a mom. I finally decided to try homemade laundry soap a few months ago.

It took finding a no-grate laundry soap recipe to convince me. I had no desire (read zero) to grate soap. Finding a no-grate recipe was perfect.

This recipe works well but I am one of those people that is never content with the recipes of others. From food to cleaning products to crafts, I like to tinker with things and make it my own. I found a bottle of lavender liquid castile soap on sale at Central Market. I’d heard great things about castile soap and decided to add it to my recipe.

Easy Homemade Laundry Soap:

• 3 tbs borax
• 3 tbs washing soda
• 2 tbs Dawn dish soap (blue is best)
• 2 tbs liquid castile soap
• about a gallon of boiling water

You’ll also need:

• a funnel
• a spoon with a long handle for stirring
• an old water jug or laundry soap jug

Instructions

1. Start a big pot of water boiling. (I boil all water used in my homemade products to prevent any yucky growth.)
2. While the water boils, use a funnel to add the dry ingredients and then the soaps to your jug.
3. Pour boiled water into the jug and give it a good stir with the handle of a long spoon.
4. Let it cool.

20120821-174152.jpg

That is it!

I mix mine in a separate gallon jug and then pour into an old detergent container with a spout. I add about 1/2 cups to each load. (I honestly just eyeball it.) The original recipe I used did not have castile soap. It worked ok but took a lot more per load.

I make it about once a month. I spent $12 total on all my ingredients (the castile soap was the most expensive) a few months ago and still have a ton left for future batches. You can double the Dawn if you can’t find castile soap. You can also add in a few drops of essential oil for fragrance if you like. My kids have super sensitive skin and have no problems with this soap.

Again, sorry for the phone pictures. My computer is being shipped off for repairs.

3 Comments »

Homemade Baby Wipes

For once my kiddos are actually napping at the same time! I decided to use the time afforded by this serendipitous event to make a new batch of homemade baby wipes and add to the blog…

What a charmed life I lead.

Anyway, as most of my friends and family know, I am all about homemade products. I try to cut as many chemicals out of our daily lives as possible. They are harmful and expensive!

I’m always scouring the net for new recipes and ideas. One great tool I’ve discovered is Pinterest. You can find so many great homemaking ideas on that site. (Follow my Pinterest boards here.)

I found several great sites for homemade cleaners and household products. One Good Thing By Jillee is my favorite. I took her recipe for wipes and tweaked it a bit to my personal preference.

You will need:

  • A paper towel roll that has been cut in half (I use Sparkle select a size and have my husband cut a few in half at a time with a super sharp straight blade. If you use a serrated blade, you will have little nubs that come off your wipes.)
  • 1 tbsp baby oil
  • 1 tbsp baby wash
  • 1 1/2- 2 cups boiled water
  • Plastic container big enough to hold the halved paper towel roll
Image

What you need!

I pour the baby oil, baby wash, and about 1 1/2 cups of boiled water into the container. I used boiled water to keep anything gross from growing on my wipes later. I try to start with less water but keep my pan of boiled water available to add more if my wipes seems too dry. You can always add more water but you can’t take it out!

Image

Still steaming from the boiled water.

Give your ingredients a swirl to mix them and then plop your halved paper towel roll right in there.
Close it up and turn it upside down to let the mixture soak into all of it. I will sometimes add a little more of the boiled water if they still look too dry after a few minutes of soaking up the mixture. At this point the noodle of the roll should slide right out.

Image

Once everything finished soak in, you are done! Just start pulling your wipes from the middle!

Image

Homemade Baby Wipes!

2 Comments »

TheBamBlog

Real. Life. Storytelling.

Nontoxic Megan

Living a healthy life (the best way I can)

scottishmomus

What I See

Stuff Kids Write

Like stuff adults write. But funnier.

Louis and Mel

Let's have some pun.

mummy flying solo

...murmurs from the depths of my world

Baking in a Tornado

Passionate parenting and homemaking.

Dates 2 Diapers

Passionate parenting and homemaking.

The Three Bears

Life as I know it...

Thirty-Four Million Moments

Everything from motherhood to love...and anything else that comes to mind.

Making Memories in The Chaos.

A family and lifestyle blog by a SAHM in Northern Ireland.

Máthair Fiona

Be thankful. Give thanks. Live thankfully.

JDunlap Gaming

A convergence of tabletop gaming, music, and geek culture.

Chronicles of the Deranged

Passionate parenting and homemaking.

What the Mom

Real tips from a mom of 4